Click below for the tutorial!
MATERIALS
- Sawzall and hand saw
- Wood screws (1 pack of 25): #14 x 2.5 inches
- Paint (I used leftover white wall paint)
- Pallet
- 2x4 wood 26 inches length (5 of them for the legs)
- 2x4 wood 20 inches long (2 of them for the armrests)
- Electric drill
- Electric palm sander
STEP ONE
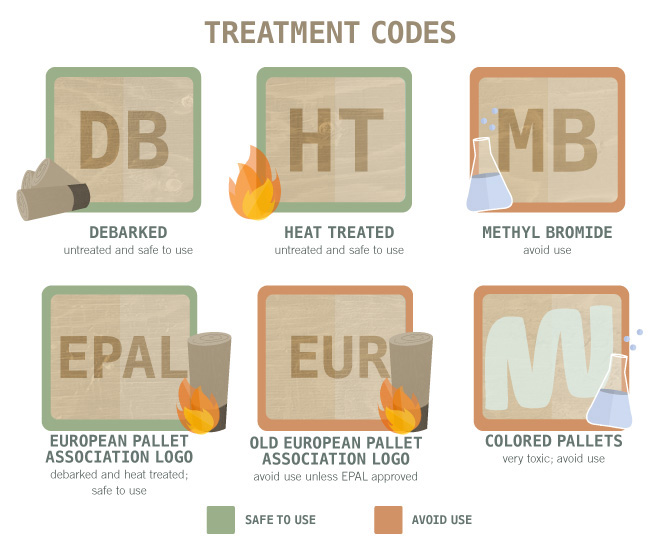
Find a pallet. I successfully coaxed Andrew to help me carry it across the street to our house. This informatic shows which pallets are safe to use and which pallets contain toxic chemicals.
STEP TWO
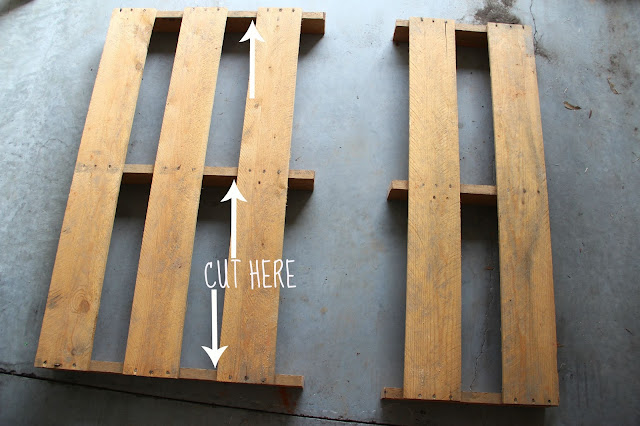
Saw the pallet in half. One half will be the bench that you sit on, and the other half is the backing to lean against. I also cut off the middle plank of the seat (see arrows) because I wanted 2 planks in the backing and 2 planks in the seat.
Saw four of the 2x4 pieces of wood 22 inches long for the four bench legs and 20 inches long for the two armrests.
STEP FOUR
Pre-drill holes and use the power drill to attach the 4 legs to the pallet. I attached the pallet to the legs at 18 inches from the ground.
Optional: Attach a 5th leg to the center of the bench. Andrew suggested (read: insisted) that we attach a 5th leg to the middle of the bench because it bowed under his weight. I initially had misgivings about having an odd number of bench legs, but after we attached it and tested out the bench with our weight, I was definitely glad that he recommended a the leg.
STEP FIVE
Attach the backing of the bench onto the posterior bench legs.
STEP SIX
Attach the armrests to the legs.

STEP SEVEN
Sand the bench. As a total newbie to carpentry I watched this video on how to attach sandpaper to a palm sander. I wore protective eyewear (big sunglasses) and a mask while sanding. Andrew has seen too many traumatic eye injuries in the ER!
Wash the pallet with a high-pressure hose and air-dry. It was actually kind of soothing to hose down the pallet wood and watch the grime, clay, and dust disappear.
At this point you can prime the bench before painting, but I had a lot of white paint sitting around in my garage so I painted 3 coats without priming.


such a creative reuse of materials!
ReplyDeleteLOVE this, lizzy!
ReplyDeletevan
ReplyDeleteerzincan
sivas
ağrı
manisa
4RDİSF
uşak evden eve nakliyat
ReplyDeletebalıkesir evden eve nakliyat
tokat evden eve nakliyat
kayseri evden eve nakliyat
denizli evden eve nakliyat
SWU50Q
DA692
ReplyDeleteBartın Evden Eve Nakliyat
Edirne Şehir İçi Nakliyat
Sakarya Şehirler Arası Nakliyat
Bitci Güvenilir mi
Uşak Evden Eve Nakliyat
Çorlu Lojistik
Ordu Lojistik
Tokat Şehir İçi Nakliyat
Mersin Evden Eve Nakliyat
A6CD0
ReplyDeleteSamsun Şehir İçi Nakliyat
Paribu Güvenilir mi
Tekirdağ Parke Ustası
Kucoin Güvenilir mi
Karaman Şehir İçi Nakliyat
Bilecik Evden Eve Nakliyat
Eryaman Boya Ustası
Afyon Evden Eve Nakliyat
Dxgm Coin Hangi Borsada
3469A
ReplyDeleterastgele sohbet
karabük ücretsiz sohbet siteleri
kocaeli görüntülü sohbet kadınlarla
Edirne Ucretsiz Sohbet
tunceli rastgele görüntülü sohbet ücretsiz
bedava görüntülü sohbet sitesi
aksaray bedava sohbet
Tekirdağ Parasız Görüntülü Sohbet
urfa yabancı görüntülü sohbet siteleri
6B5F27E72D
ReplyDeletetiktok takipçi
94665B5307
ReplyDeleteucuz takipçi satın al
830BE73488
ReplyDeletetakipci satin al
DDAAA76B0F
ReplyDeletetakipci satın al
B32A23B81C
ReplyDeleteinstagram türk takipçi alma
tiktok beğeni satın al
organik takipçi
düşmeyen takipçi
organik takipçi
I love the idea of repurposing pallets into furniture.
ReplyDelete